Replay Screen Setup Instructions (PCS Pro) Follow
PCS Pro Replay Screen/Scoreboard Function
This document provides instructions for setting-up the Replay Screen/Scoreboard function within PCS Pro, although it also involves checking some Windows settings and connecting to the screen/scoreboard hardware. It is assumed that the PCS Pro software has been installed on the laptop that will drive the replay screen/scoreboard, but if not please see the separate installation instructions.
Please ensure that the replay screen/scoreboard is powered-up, all control equipment is turned-on, and that the scoring laptop is plugged into this via an HDMI cable before starting the laptop. Next, open the PCS Pro software. The replay screen/scoreboard output can be setup without logging-in, so click Continue without Login if a login is not available or this is easier.
If a match is not open within PCS Pro, open any match under File -> Open Match (even a completed one) so that a scoreboard slide loads in the Main Scoreboard preview window (usually at the top-right of the main PCS Pro interface). At this point, minimise PCS so that you can access the Desktop to check key Windows settings to help output to the replay screen.
Windows Settings
Right-click anywhere on the Desktop and select Display Settings from the menu (second from bottom). On the window that opens, there should be a graphic at the top showing two monitors, with the laptop screen as number 1 (highlighted in blue) and the replay screen as number 2, for example:

NB: The 1 and 2 may be the other way around, depending on the default setup, but this can be changed).
If you are not sure which ‘box’ above is which ‘monitor’ (i.e., laptop or replay screen), click Identify and a 1 should appear at the bottom-left of the laptop screen, and (if all other settings are already correct) a 2 will appear at the bottom-left of the replay screen. The number displayed on each corresponds to the number in the boxes above.
With the laptop screen ‘box’ highlighted in blue, below this graphic check that under Scale and Layout that the size of text, apps, and other items is set to ‘125% (Recommended)’. If this is set to 100% you will need to logout and back in again for the change to take effect, but it is not critical to do this immediately, and it may even be that 100% is sufficient on the laptop screen.

Also check that the Resolution is set to the maximum the laptop can handle (hopefully this is 1920 x 1080) and that the Orientation is set to Landscape. Then, under Multiple Displays, check that this is on Extend These Displays, but if not select this from the dropdown menu. Finally, ensure that the Make This My Main Display checkbox is ticked for the laptop screen.
Then, return to the monitor graphic at the top and click on the number 2 box to highlight this in blue. This will give the name of the second monitor under Color Profile, which is useful to note for later. Under Scale and Layout, the size of text, apps, and other items should be set to 100% (Recommended), NOT 125%.
The Resolution will default to whatever the resolution of the Replay Screen is, but this should be 1920 x 1080 as well, assuming a modern 16:9 screen. Orientation should also default to Landscape, as will Multiple Displays to Extend These Displays, and the Make This My Main Display should be UN-ticked.
Once all of this is correct, minimise or close this window and return to PCS Pro.
PCS Pro Settings
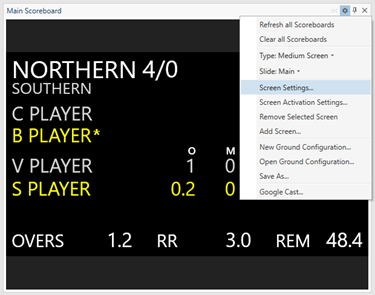
The Main Scoreboard panel is a preview of the output to be sent to the replay screen. With the default match open and a few balls scored (as above, or use Open Match to open an existing match from the UAT server), click on the settings cog at the top-right corner and select Screen Settings from the menu:
This will open the Update Screen window that controls PCS Pro outputs to the replay screen.
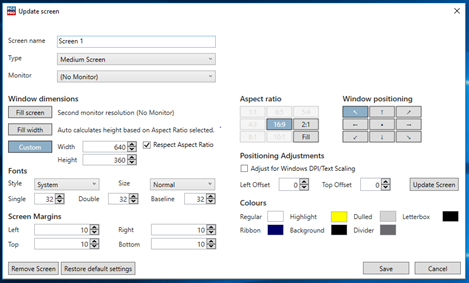
The key setting to confirm first is the Monitor, which needs to be the name of the replay screen monitor and can be selected from the dropdown list, as this setting is likely to have defaulted to (No Monitor).
After selecting this, check that Type is set to Medium Screen or Medium Screen (Left/Right), depending on Gloucestershire CCC’s preference (do not use Large, as the details provided by GCCC indicate only a 25m2 replay screen), change Fonts -> Style from System to Normal, and check that Aspect ratio has defaulted (highlighted in blue) to 16:9 and Window Positioning to the top-left arrow.
For now, ignore the Custom -> Width/Height numbers, but the Respect Aspect Ratio checkbox should be ticked (NB: these secondary settings can be adjusted later if the output is not ‘perfect’ on the replay screen on first attempt).
Once these basic settings have been confirmed, click Update Screen and the Main Scoreboard preview should now display on the replay screen!
If so, and the output ‘perfectly’ fits the physical size of the replay screen, then re-open this Update Screen window and overwrite Screen Name with, e.g., GCCC Replay Screen, reduce all the Screen margins to 5 or even 2 (check that this doesn’t make any slide – Main, Batting 1, etc – too ‘tight’ on the edges of the replay screen, after clicking Update Screen), and make any changes to the various Colours, then click Update Screen to update the display both within PCS Pro and on the replay screen itself.
If there is no display on the replay screen after the basic settings have been confirmed and Update Screen clicked, the two key things to re-check are Extend These Displays (Windows) and Monitor (PCS Pro).
The most likely cause of the preview not displaying is because the replay screen monitor is not on the Monitor dropdown list. If not, ensure that the replay screen and all its sending equipment are turned-on and the laptop is properly connected via HDMI, then re-start the laptop. As Windows only detects external monitors on boot-up it is likely that it did not see the replay screen monitor initially, hence no display of the Main Scoreboard monitor. Once the laptop has re-started, re-open PCS Pro, go to Screen Settings, and the replay screen monitor should now be available on the Monitor dropdown.
NB: If a Monitor has been assigned on the Update Screen window, but Windows cannot detect that monitor, the Main Scoreboard preview will output onto the laptop screen as well. So, if this has happened at any stage in the above process then this means that Windows cannot ‘see’ the external monitor; i.e., the laptop does not know that it is plugged into the replay screen, so un-assign the Monitor and re-start the laptop, with everything plugged-in.
If there is a display on the replay screen but it is not ‘perfect’, e.g. it is only showing some of the Main Scoreboard preview (in which case the font is likely to be too big), or it is not aligned properly, and is off to the left or right, then on the Update Screen window experiment with the following settings:
- Window Dimensions -> Custom -> Width and Height, as GCCC may know the exact pixel dimensions of their replay screen, so enter these;
- If the screen is not exactly, 16:9, untick the Respect Aspect Ratio checkbox AND, under Aspect Ratio, change this from 16:9 to Fill
- If this does not work, try Window Dimensions -> Fill Screen and Fill Width, remembering to click Update Screen (or Save, but this closes window) each time a setting is changed;
- The last resort is to change the Positioning Adjustments settings, by ticking the Adjust for Windows DPI/Text Scaling and entering (possibly negative) numbers into the Left Offset and Top Offset values, to move the output left or right and up or down
- However, if you get to this point it might be worth a phone call to me while GCCC are doing this, as it is tricky and varies from screen-to-screen because of weird stuff that Windows does!
Finally, once the replay screen display is ‘perfect’, click Save on the Update Screen window, but then go back to the Main Scoreboard settings cog menu, select Save As and name a Ground Configuration file; e.g. Bristol County Ground, to save these settings as the default for every time PCS Pro is opened.